Maestro: A single framework for mobile and web E2E testing

I've recently been working on a personal project that has both mobile and web frontends. I wanted to include E2E tests, but I didn't want to spend a bunch of time getting all of that setup for web, iOS, and Android.
I just wanted a handful of happy-path E2E tests for an app that could run on a desktop browser, mobile browser, and native mobile.
Most importantly, I wanted to get this running quickly so I could focus on actually building the app. That's when I found an open source tool called Maestro.
What immediately caught my attention with Maestro is that it's so easy to get setup, and it handles both web and mobile with the same tool and syntax.
Here's What a Test Looks Like
Maestro tests are written in YAML. Here's a simple desktop browser example that searches DuckDuckGo:
1url: https://duckduckgo.com
2---
3- launchApp
4- tapOn:
5    text: 'Search without being tracked'
6- inputText: 'Maestro e2e testing'
7- pressKey: Enter
8- assertVisible: ".*Maestro is an open-source framework.*"
Pretty straightforward, right? It opens DuckDuckGo, taps the search box, searches for "Maestro e2e testing", and verifies that the results contain "Maestro is an open-source framework". Note that for partial text matching, Maestro uses regex—the .* pattern means "any characters", so ".*text.*" effectively does a "contains" match.
To be honest, I was not super excited to work with a tool that uses YAML to define the tests. In my regular job I spend a lot of time building out code-based automation suites, and that usually feels like the "right" way to do it. But is that always the case?
My personal project is not super complex, and I don't have a team of test automation folks. I have one dev and one QA, and they are both me. I want E2E tests, but I want to focus the majority of my time on building the app, not building fancy-pants automation frameworks.
Let's run this test!
Setup
I am not assuming that everyone uses a Mac, but that's what I'm using so keep that in mind if you're reading this as a Windows or Unix person. Maestro is cross-platform, but some of the install steps will be different. See their setup documentation for more details.
First, let's install Maestro. Open your terminal and run:
1curl -fsSL "https://get.maestro.mobile.dev" | bash
Or you can use Homebrew:
1brew tap mobile-dev-inc/tap
2brew install maestro
Verify it worked:
1maestro --version
OK so what do I need to install next? Huh, that's it?? Well then... let's run the test!
Running a Test
1maestro test flows/duckduckgo-search-desktop.yaml
Maestro will open a browser, run through the test steps, and show you the results. If something fails, the output helps you figure out what went wrong, and you'll also get some detailed log files. Hopefully your run will look like this:

Running the Same Test on Mobile Browser
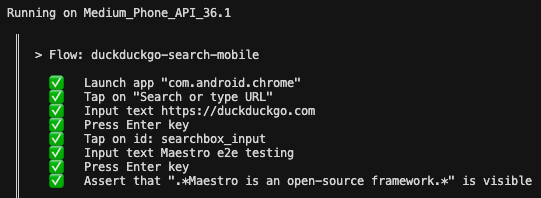
You can run a similar test on a mobile browser. Here's the mobile version:
 1appId: com.android.chrome
 2---
 3- launchApp
 4- tapOn: "Search or type URL"
 5- inputText: "https://duckduckgo.com"
 6- pressKey: Enter
 7- tapOn:
 8    id: "searchbox_input"
 9- inputText: "Maestro e2e testing"
10- pressKey: Enter
11- assertVisible: ".*Maestro is an open-source framework.*"
Notice how the syntax is almost identical. The main difference is using url: for desktop browsers and appId: for mobile browsers. Other than that, Maestro uses the same commands for both.
To run this, you'll need an Android emulator. If you have Android Studio installed, you can use the AVD Manager to create one. Make sure Chrome is installed on the emulator (it usually is by default).
Once your emulator is running, just run the test:
1maestro test flows/duckduckgo-search-mobile.yaml
Hopefully you'll see the same interactions that you saw with the desktop browser test, and the same green results, like this!
You now have a taste for browser-based Maestro testing on a desktop browser and a mobile browser. Let's move away from the browser and use Maestro test a mobile app.
Testing a Native Mobile App
The built-in Android Contacts app is perfect for this because it's available on every Android device and works great in an emulator. Notice how the syntax is the same as the web test. Maestro uses the same commands whether you're testing web or native mobile.
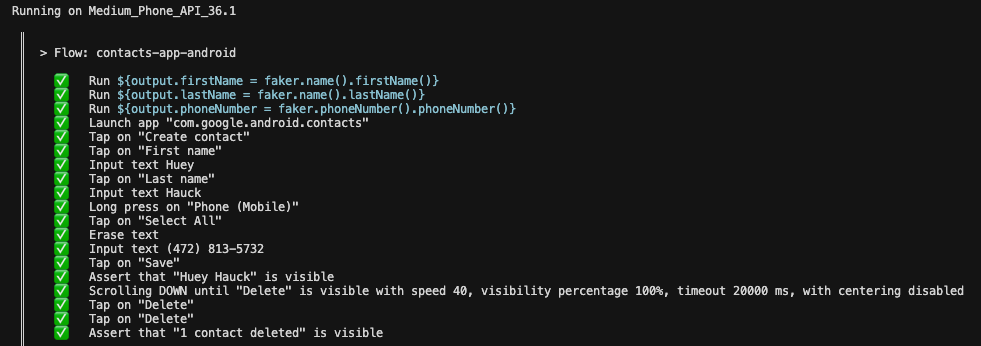
Here's a test that creates a new contact:
 1appId: com.google.android.contacts
 2jsEngine: graaljs
 3---
 4- evalScript: ${output.firstName = faker.name().firstName()}
 5- evalScript: ${output.lastName = faker.name().lastName()}
 6- evalScript: ${output.phoneNumber = faker.phoneNumber().phoneNumber()}
 7- launchApp
 8- tapOn: "Create contact"
 9- tapOn: "First name"
10- inputText: ${output.firstName}
11- tapOn: "Last name"
12- inputText: ${output.lastName}
13- longPressOn: "Phone (Mobile)"
14- tapOn: 'Select All'
15- eraseText
16- inputText: ${output.phoneNumber}
17- tapOn: "Save"
18- assertVisible: ${output.firstName + " " + output.lastName}
19- scrollUntilVisible:
20    element: "Delete"
21- tapOn: "Delete"
22- tapOn: "Delete"
23- assertVisible: "1 contact deleted"
This test is a bit more advanced as it demonstrates Maestro's ability to generate dynamic test data using Faker. The jsEngine: graaljs setting enables JavaScript execution, and the evalScript commands at the top use Faker to generate random first names, last names, and phone numbers. These values are stored in the output object and referenced throughout the test using ${output.variableName} syntax.
This is just one example of integrating JavaScript with Maestro scripts. More detail can be found here.
Running It
With your emulator running, execute:
1maestro test flows/contacts-app-android.yaml
The test will run, and you'll see the emulator actually perform the actions. If it passes, you'll see a nice success message. If it fails, Maestro will tell you what went wrong and where. Here's what I see:
Maestro MCP
MCP (Model Context Protocol) is a standardized protocol that bridges tools (like Maestro) to LLMs (like Claude or ChatGPT). Think of it as a universal connector that lets these AI models access and interact with your development tools.
Why it matters: If you're using these LLMs in your development workflow, Maestro includes an MCP that lets them interact with Maestro directly. They can read your test files, understand your test structure, suggest improvements, or even generate tests based on your app's behavior.
How to use it: The MCP server comes bundled with Maestro. To use it in Cursor:
- Open Cursor Settings
- Navigate to the MCP section
- Click "Add new MCP Server"
- Configure it with:
1{
2  "mcpServers": {
3    "maestro": {
4      "command": "maestro",
5      "args": ["mcp"]
6    }
7  }
8}
- Save and restart Cursor
Similar functionality is available in other tools like VS Code through MCP extensions. Once connected, the AI assistant can discover your Maestro flows, understand your test structure, and help you write better tests.
More details can be found here.
A few things I didn't cover but want to mention
Maestro is easy to run on you CI platform, and also has a Cloud plan. More info here.
Maestro has a ton of sample flows to help you learn more here.
Maestro has an IDE to help with identifying UI elements, generating code, and running commands. Check it out.
Take a look at docs.maestro.dev for more examples, advanced features like nested flows and conditions, page objects, and tips for structuring larger test suites.
Happy building and testing. Peace out!